Introduction
Everyday tin cans often end up in the trash, but these simple containers can be transformed into stylish and useful crafts. Using tin cans for crafts saves waste and lets you create unique items that brighten your home. Stylish tin can crafts to upcycle everyday containers offer a fun and practical way to recycle.
In this article, you will discover easy projects to turn tin cans into planters, organizers, lamps, and more. You’ll learn about the tools needed and techniques to decorate your cans with paint, fabric, or paper. Whether you want to organize your space or add personal decor, tin can crafts provide a creative outlet anyone can try.
Getting Started with Tin Can Crafts
When you first start with tin can crafts, the simplest step is to gather cans that are clean and manageable. Not all cans are created equal for crafting. You’ll find some have smoother edges, different shapes, or sizes, and those small differences actually matter when you decide what to make.
Cleaning the cans well is key. I usually soak them in warm, soapy water for a while—sometimes longer than you’d expect because glue from labels can be a bit stubborn. Once softened, peeling off labels without tearing or leaving residue is easier. Scrubbing gently with a sponge helps, too.
Be mindful of sharp edges, especially along the top and bottom rims where lids were opened. These can catch your fingers quickly. You don’t need fancy tools; simple sandpaper or even a nail file can smooth these edges out. Sometimes I wrap a bit of tape around rough spots if I’m in a hurry, but sanding feels safer in the long run.
Choosing the right tin cans might depend on your project. Tall, slim cans work well for lanterns or pencil holders. Wide cans suit planters or utensil holders. Odd shapes? They’re perfect if you want something a bit offbeat. I’ve used everything from coffee tins to tomato cans—just keep an eye on how sturdy they feel.
For those starting out, prepare everything beforehand. Make sure cans are dry and edges are safe before any painting or decorating begins. It’s tempting to skip a step, but trust me, handling sharp, dirty cans is no fun. You want the process to be enjoyable and, well, a little relaxing too.
Simple Decoration Techniques for Tin Cans
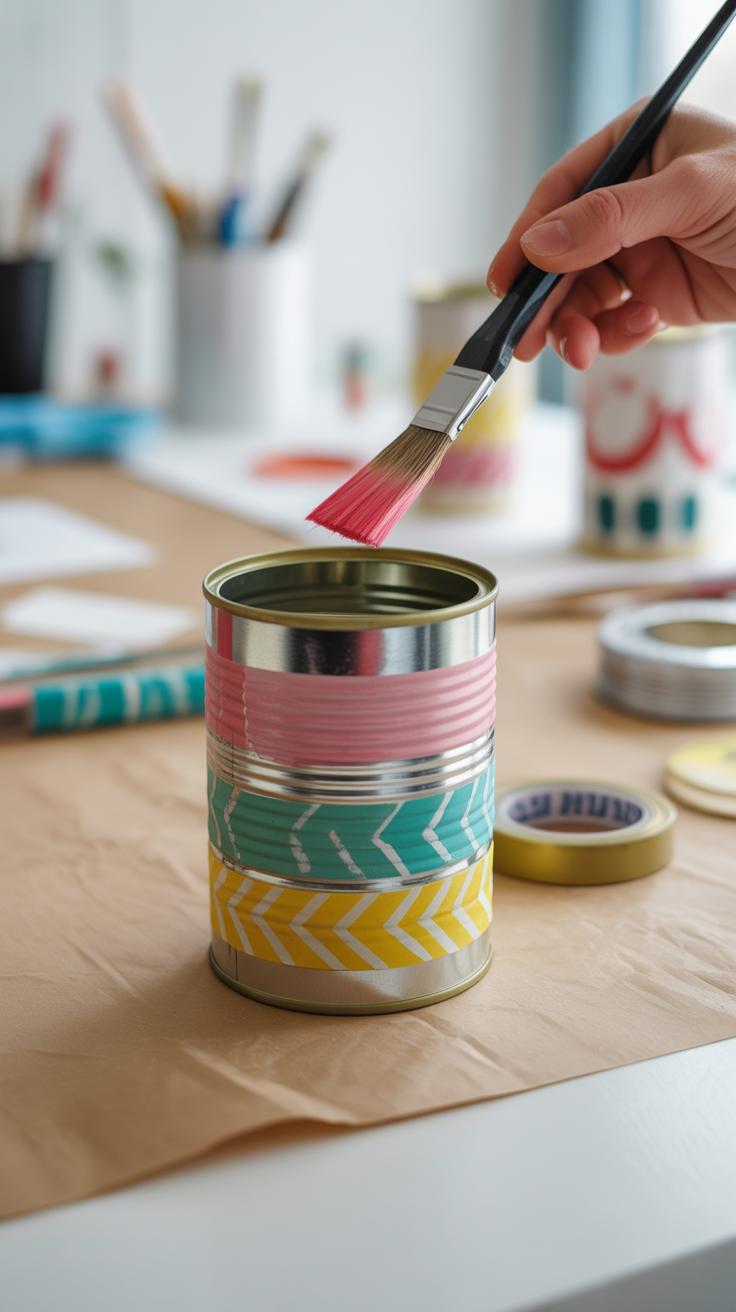
When it comes to personalizing tin cans, you don’t need a lot of fancy tools or skills. A bit of paint, some fabric or decorative paper, and stickers can turn a plain can into something truly your own. I think the charm lies in how simple these methods are—you can tweak them a little or a lot depending on your mood or style.
Painting the cans is a classic choice. You can go for bright solid colors or try patterns with stencils. Wrapping with fabric adds a cozy touch, and paper lets you play with prints and textures. Stickers, though often overlooked, can be a quick fix or a playful element. Mixing these techniques? Sure, that’s an option too—go wild or keep it subtle.
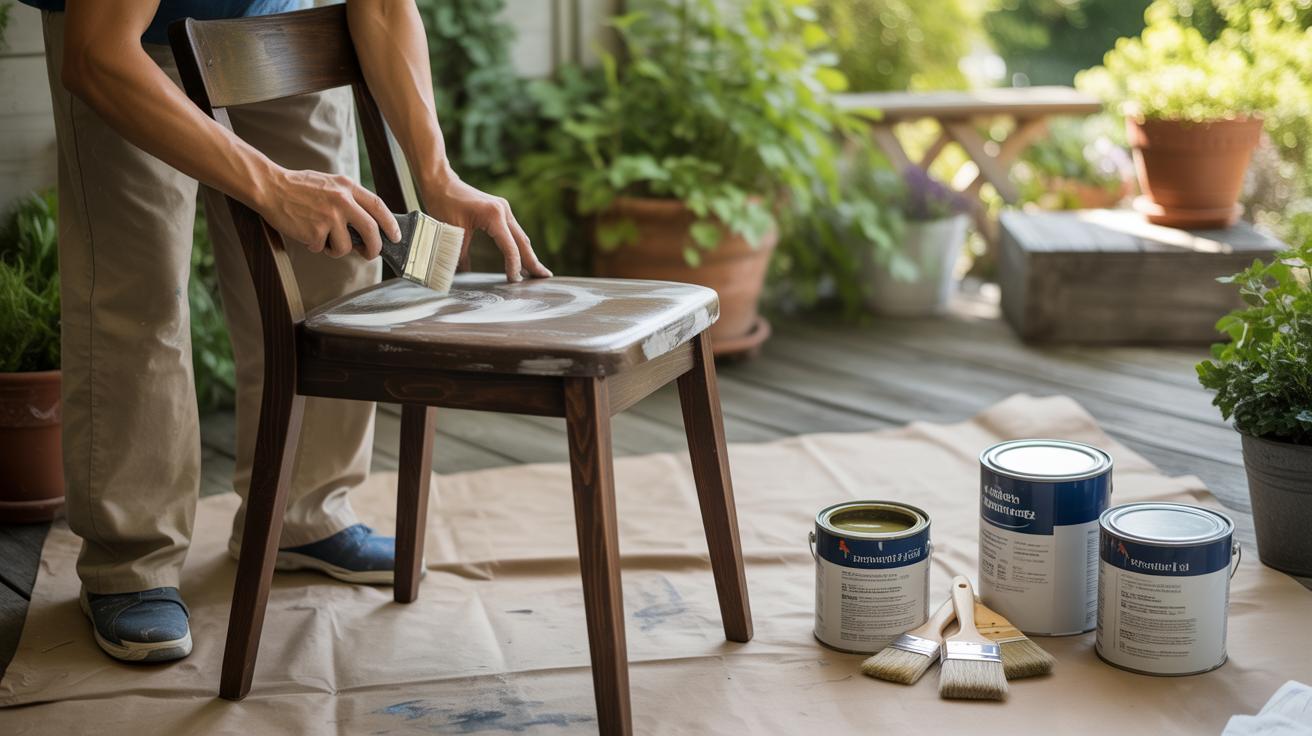
Painting Tips for a Smooth Finish
Painting tin cans sounds straightforward, but getting a smooth, neat finish takes some care. Here’s what I stick to:
- First, clean and dry the can completely. Any moisture or grease will mess up the paint.
- Use a primer made for metal surfaces. It helps paint stick better and prevents peeling.
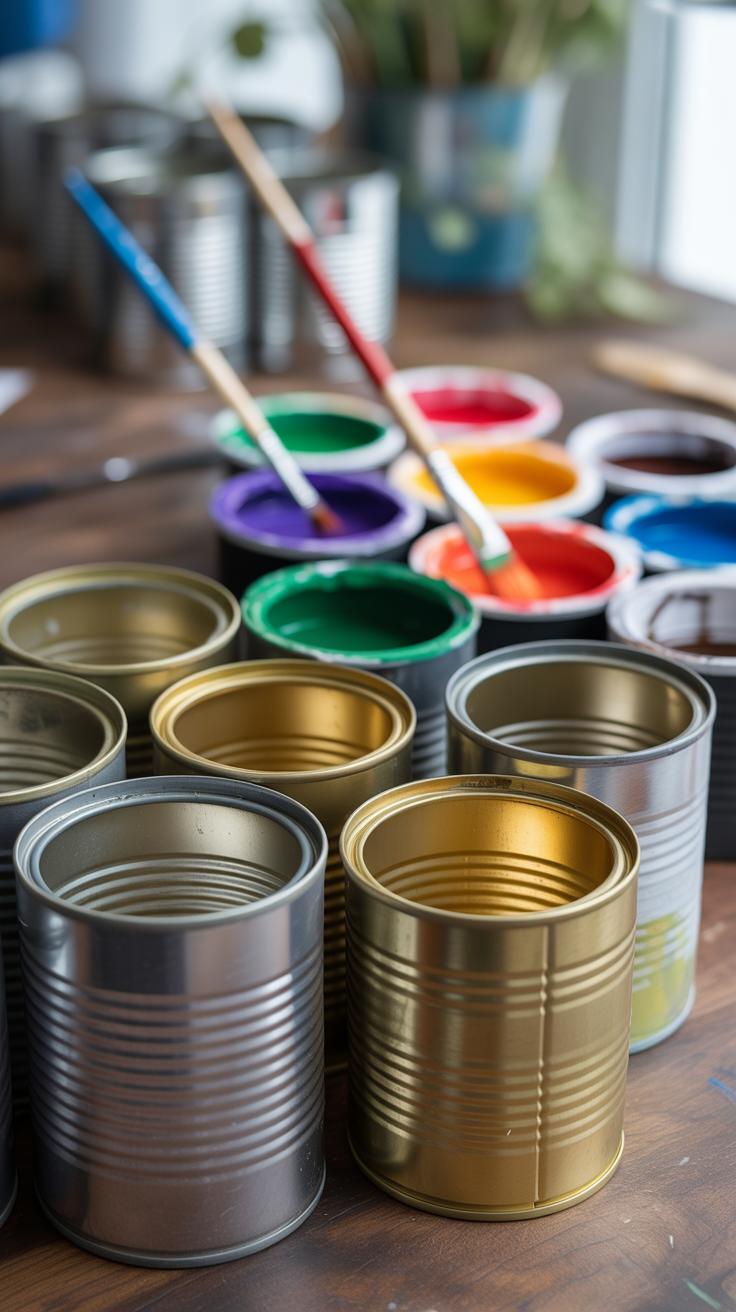
- Opt for acrylic or spray paint—both work well. Acrylic gives control with brushes. Spray paint covers evenly but watch for drips.
- If you’re brushing, pick a flat, soft brush to avoid streaks.
- Apply thin coats, letting each dry before the next. Rushing leads to clumps and uneven spots.
- Sanding gently between layers with fine grit sandpaper can help smooth rough patches.
Stay patient. Rushing rarely pays off with paint, at least in my experience.
Using Fabric and Paper to Customize Your Cans
Covering cans with fabric or paper feels less messy, and it’s a great way to bring in patterns or textures. I’ve found that backing your fabric or paper with a thin layer of craft glue works best. Spread the glue thinly on the can’s surface, then slowly wrap your chosen material around it, smoothing out wrinkles as you go.
Tape, pins, or clips can hold things in place if the glue takes a little longer to dry. Remember, fabrics with thicker textures give a rustic look, while smooth, glossy papers create a cleaner vibe.
If you want to get creative, layering different papers or fabrics can add depth. Maybe a strip of lace over colored paper? Or a band of patterned fabric at the rim? The possibilities are surprisingly flexible.
I sometimes wonder if these simple crafts appeal more because of their ease. After all, you can change or redo the cover anytime—spontaneity is allowed here, which is a relief.
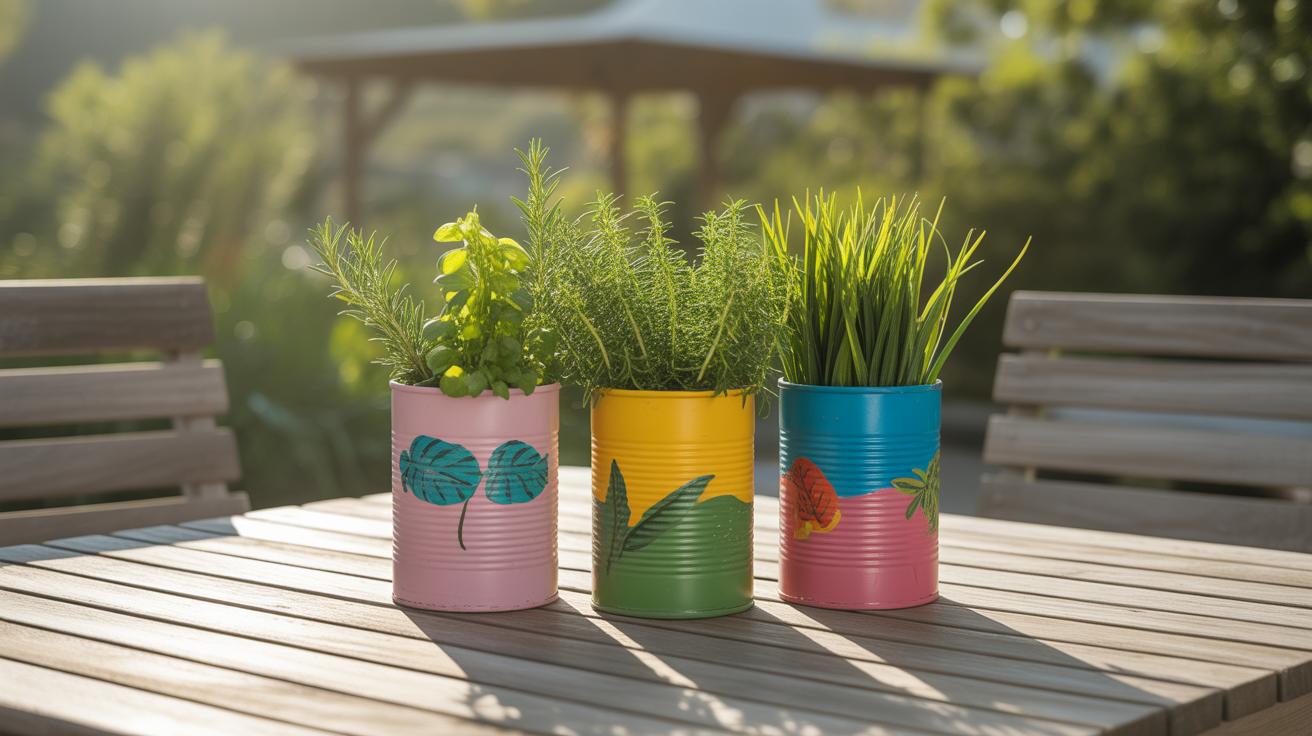
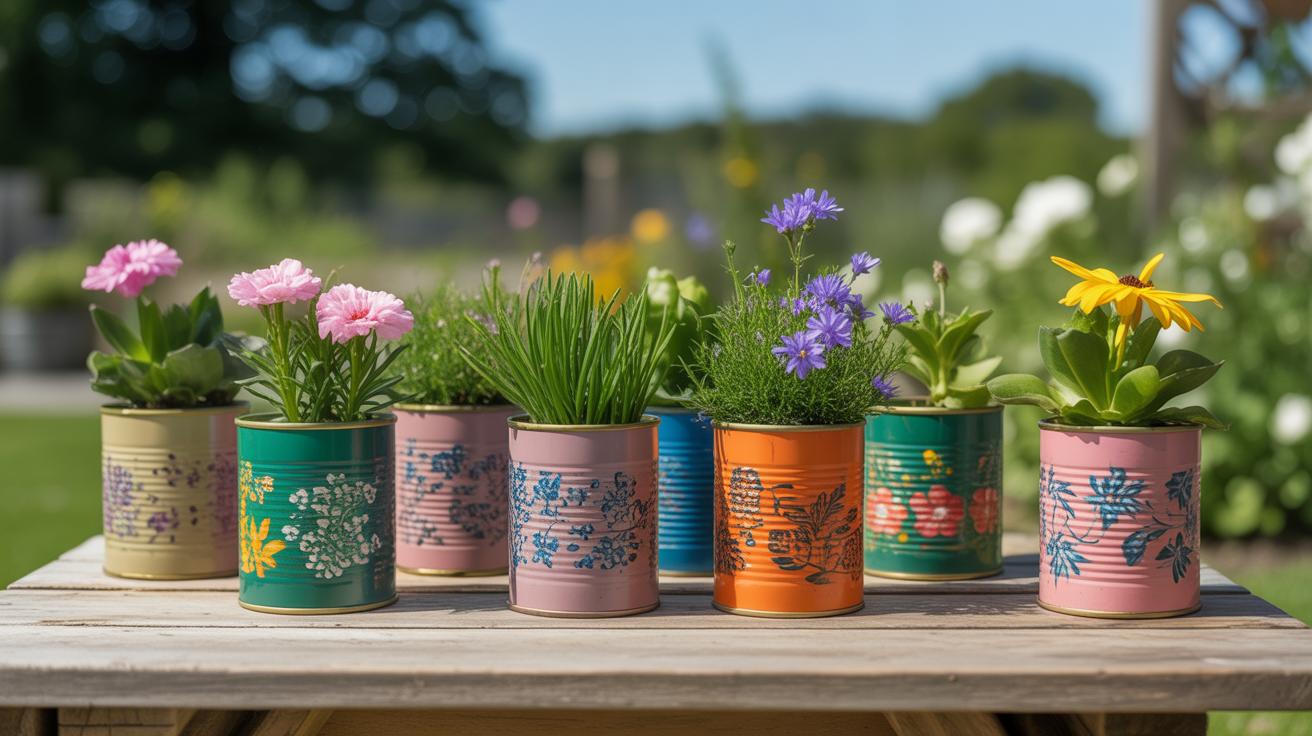
Creating Planters from Tin Cans
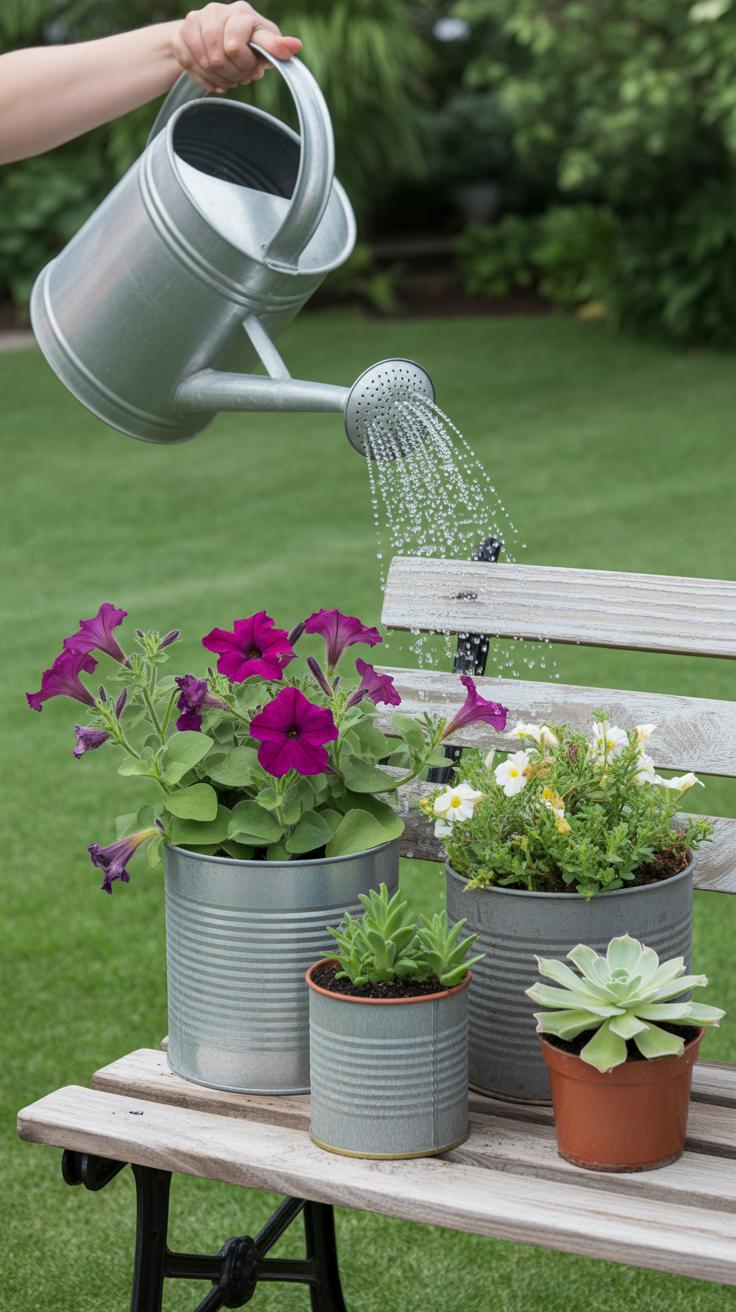
Turning tin cans into planters is surprisingly straightforward, but a few details really matter if you want your plants to thrive. First off, drainage is key—you’ll want to poke holes in the bottom of the can using a nail and hammer or a drill if you have one. Just a few holes spaced out will allow excess water to escape, preventing root rot, which can be a sneaky problem in small containers.
Before adding soil, consider lining the inside with a thin layer of gravel or small stones. This helps with drainage too, keeping the roots from sitting in water. Some people use coffee filters or old mesh to separate soil from the gravel—might sound a bit much, but I find it really helps with cleanliness and root health in the long run.
Once your can is prepped, it’s time to personalize. You already know about painting and wrapping, so go ahead and use some of those techniques, but think about sealing your decorations with a clear matte spray if you plan to keep your planter outdoors. The weather can be surprisingly rough on those finishes.
Preparing Cans for Plants
Drainage holes alone don’t make a healthy setup. The inside surfaces of the cans can rust over time, which isn’t ideal for your plants. You might want to line the inside with plastic wrap or cut a durable plastic bag to fit inside and protect the metal. Just make sure the drainage holes remain uncovered so water can escape freely.
Also, think about the soil you use. A potting mix designed for containers is best because it holds moisture while allowing air to reach the roots. For better growth, remove any sharp edges around the can’s opening—nothing worse than snagging your fingers when you’re watering or moving the planter.
Best Plants for Tin Can Planters
Small containers limit root space, so opt for plants that don’t mind a bit of confinement. Succulents like jade or echeveria are popular choices—they don’t need frequent watering, which suits tin cans that dry out quickly. Herbs like basil, mint, or chives work well too, especially indoors near a sunny window.
If you want something flowering, think about small African violets or pansies for outdoors. They don’t take up much room and add a nice touch of color.
One thing to remember: frequent watering might be necessary. The soil in tin cans can dry out fast, and that’s a double-edged sword. It’s good to prevent overwatering but watch for signs your plant is thirsty. So, starting with low-maintenance plants can save you some trial and error.
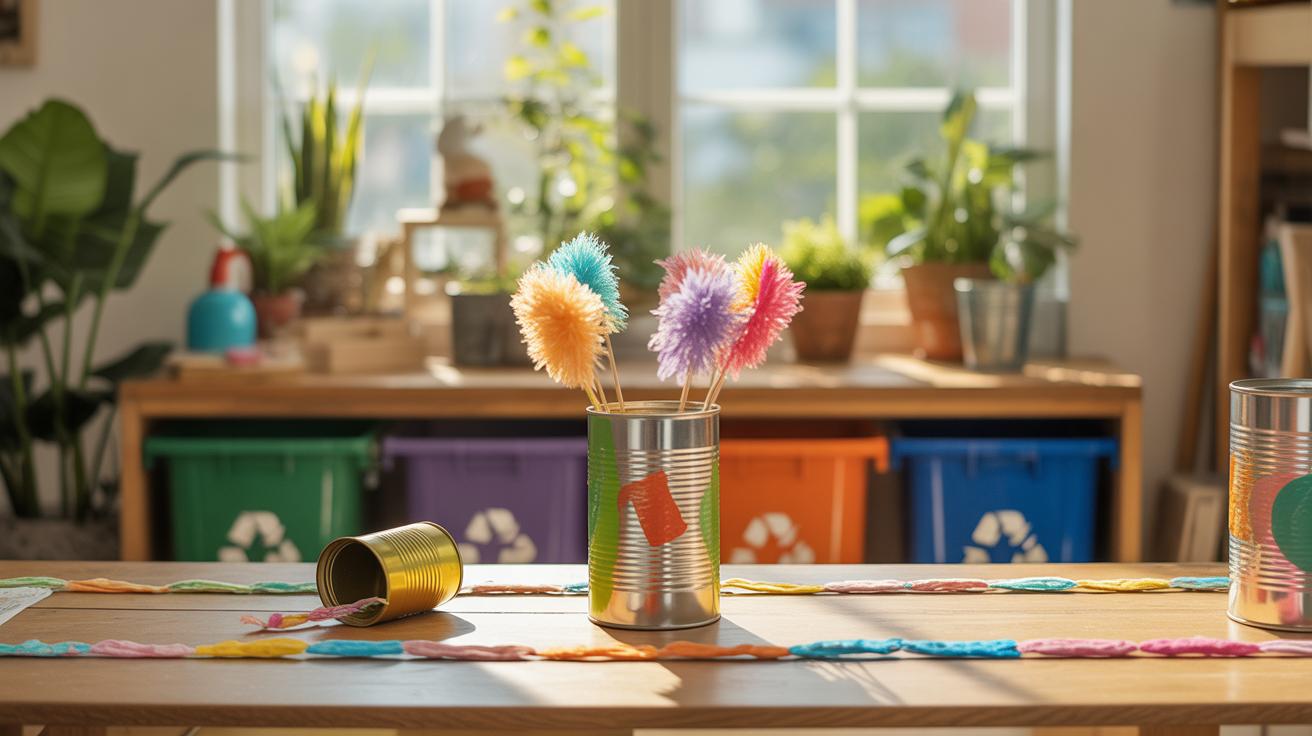
Organizing Your Space with Tin Can Crafts


Using tin cans to hold small items like pens, utensils, or makeup brushes is surprisingly practical. They’re sturdy and come in all sorts of sizes, which lets you match the can to the stuff you want to organize. Sometimes, I find the plain metal a bit dull, so a quick coat of paint or wrapping the cans in fabric instantly lifts their look without much effort.
Grouping cans can make a real difference too. For desks, try clustering three to five of them on a wooden tray or a simple stand. You can keep pencils in one, paper clips in another, and scissors somewhere else. It makes things feel tidier, though sometimes it feels a little crowded.
In the kitchen, grouping cans for utensils works just as well. For instance:
- One tin for spatulas and wooden spoons
- Another for knives and forks
- A smaller can for measuring spoons or chopsticks
Decorating cans with patterned paper or chalkboard paint is not only fun but also lets you change things up when you want—a quick wipe and a new label can mean a whole new use.
Speaking of labels, personalizing your cans can help avoid mix-ups. You can simply write on masking tape or use printed labels. For kids’ rooms, colorful tags work well, but for bathrooms or offices, something more subtle might be better. I tend to switch labels around depending on what I need that week.
Customizing your tins for different rooms or uses brings a bit of order to chaos, but sometimes it’s okay to let things stay a bit messy—life isn’t always perfectly organized, right?
Making Lighting Features with Tin Cans
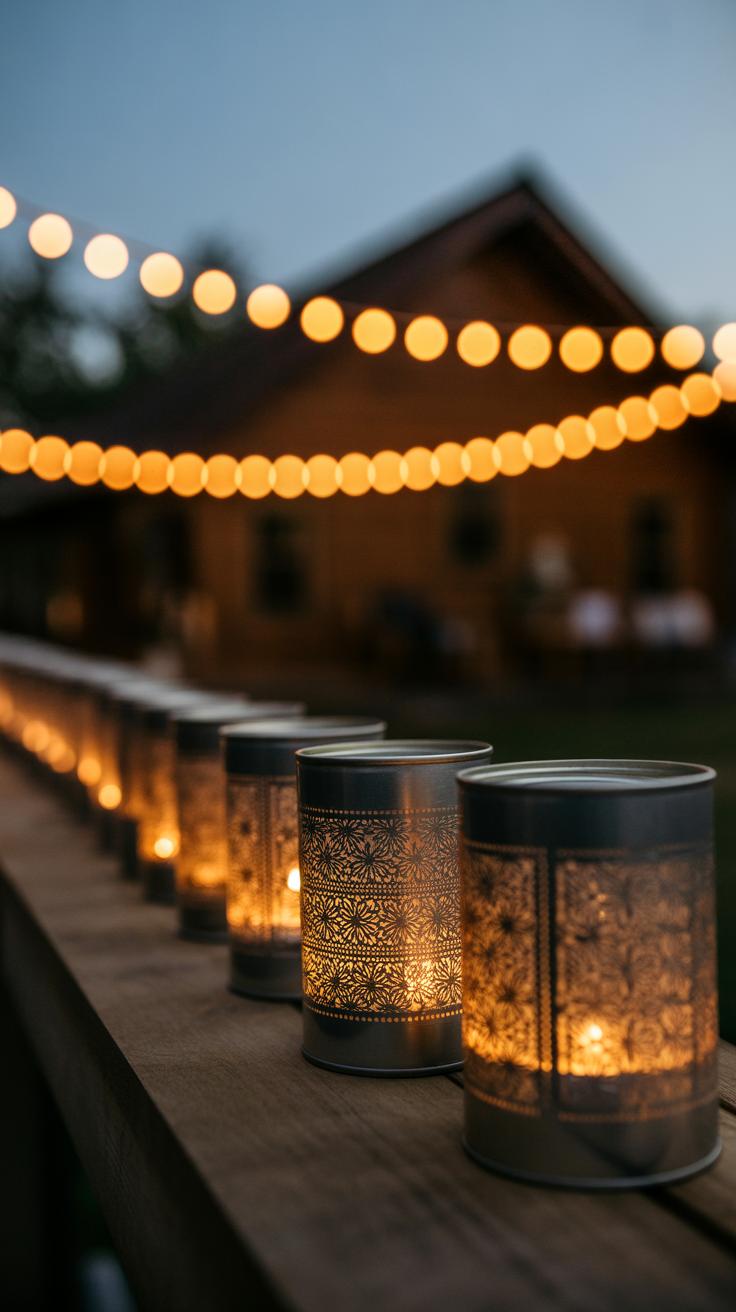
Crafting Tin Can Lanterns
Turning tin cans into lanterns is surprisingly simple and adds a warm glow to any space. Start by cleaning your cans thoroughly and removing labels. To create patterns, use a hammer and nails or a specialized punch tool to carefully make holes in the metal. You can form shapes, dots, or even words—whatever feels right. It might take some patience to get the spacing even, but imperfections can add charm.
After punching your design, smooth any sharp edges with sandpaper or a metal file—this step is easy to overlook but important. Then, place a small candle or an LED tealight inside. I usually prefer LEDs for safety and longevity; they don’t heat up and avoid the risk of burns. The light flickering through the holes creates a calming effect, perfect for patios or cozy corners. It’s a fun way to upcycle and get a decorative result without much fuss.
Safety and Placement Advice
When using candles inside your tin can lanterns, remember that metal conducts heat. Never leave a lit candle unattended, and only use lanterns on non-flammable surfaces. Tin cans can get hot, so keep them out of reach of pets and kids. If you opt for real flames, consider placing a small layer of sand or salt at the bottom to stabilize the candle.
LED lights eliminate most safety concerns but watch for batteries overheating—rare but possible. Display your lanterns where you can enjoy their glow without crowding, like window sills, entryways, or garden tables. Avoid windy spots if you’re using candles, as gusts can extinguish flames or cause wax spills.
Have you tried topping your lantern with a wire handle? That allows hanging, which changes how your light interacts with the surroundings. It makes you wonder—what spaces in your home could use a little soft lighting, quietly crafted from something as simple as leftover cans?
Advanced Tin Can Projects to Try

If you’re ready to take your tin can crafting beyond the basics, there’s a whole world of projects that blend creativity with usefulness. Bird feeders, for example, are a popular step up—you can shape a tin can into a cozy feeding spot that attracts your neighborhood’s feathered friends. It’s not just about slapping on some paint; you’ll think about holes for perches, drainage, and ease of refilling. It might take a bit of trial and error, but that’s part of the fun, isn’t it?
Wind chimes made from tin cans can be surprisingly charming. Cutting the cans into strips or shapes and suspending them with thin wire will give you a gentle melody on breezy days. The sound depends on the thickness of the metal and how you arrange the pieces, so experimenting here feels more like an art than a science. If you want to push your skills further, you can mix in beads or small bells for variety.
Then, there are desk lamps crafted from tin cans. These need some patience and maybe basic electrical knowledge. You’ll drill holes for wiring and figure out how to hinge adjustable parts. The great thing about these is they’re functional art—practical yet personal. Whether your space calls for a minimalist look or something more detailed, the can’s shape offers a good foundation.
Working on these projects will stretch your abilities and give you something that’s not just pretty but also serves a purpose. There’s something satisfying in building with your hands, seeing waste turn into items that can brighten your home, garden, or workspace.
Building Functional Items
Making practical tin can items isn’t just decorative — they can genuinely improve your day-to-day living. Take a bird feeder, for instance. First, clean and label your tin can, then punch holes near the edge for string or wire to hang it. Cut openings carefully to create feeding ports and add small sticks or dowels as perches. Filling it with birdseed invites wildlife right up close. It’s simple, but effective.
For a garden watering can, you could punch small holes in the lid to let water flow gently. This converts a can by giving it a new, useful function outdoors. It might seem basic, but creating items that work well can be trickier than it sounds—balance, durability, and design all demand attention.
When building desk lamps, start by securing a battery-powered LED light inside the can. Use heat-resistant gloves while drilling and wear protective eyewear. These steps make sure your finished lamp isn’t just clever-looking but also safe.
Decorative Crafts for Gifts
Personalized gifts make tin can crafts more special. You could create custom pencil holders decorated with names or meaningful designs carved out with nail tools. Think about filling painted tin cans with treats or small plants. A simple but heartfelt idea is to attach a photo or a handwritten note to the can’s side. It shows effort without needing complex crafting skills.
Decorative tins can also serve as unique vases or candleholders when filled with sand or pebbles. Adding ribbons, lace, or fabric scraps can make them look quite polished, perhaps even elegant. Gifts like these might feel homemade but don’t come off as half-finished when you put in just a small amount of extra thought.
In the end, the variety of advanced tin can projects means there’s something for every skill level and interest. Maybe start with one that feels the most manageable and see how you go from there.
Tools and Materials for Tin Can Crafting
When preparing for tin can crafting, you don’t need a long list of fancy tools. Most basics are easy to find and affordable if you look around a bit. Grocery stores, dollar shops, or even your own kitchen drawer might already have some of what you need. But what exactly should be on your bench when you get started?
Basic Tools for Beginners
Start simply. A sharp pair of scissors is a must, though sturdier ones work better for cutting metal edges—regular scissors sometimes struggle with tin. Along with these, a pair of pliers helps you bend or twist pieces safely without hurting your fingers. Sandpaper is another essential—you want to smooth rough, sharp edges that can be quite unforgiving. As for painting, you might pick up acrylic paints or spray paint from any craft store; they dry quickly and adhere well to the metal surface.
I recall fumbling around with cheap pliers once and regretting it. So don’t hesitate to invest a little for comfort and safety. But hey, you don’t need the top-tier kind either.
Optional Supplies to Enhance Projects
Once the basics are in place, it’s tempting to add a few extras to make your creations pop. Hot glue guns are surprisingly handy—they cut down crafting time and hold decorations firmly. If you want to play with patterns or add neat shapes, stencils open up many design options. And for that finishing touch? Think buttons, ribbons, and beads—small decorations that can transform a plain can into something quite unique.
Honestly, gathering a few extras might feel overwhelming initially, but they can turn an okay project into something really eye-catching. Do you prefer a sleek look, or something quirky and colorful? Your tools can help you decide.
Keeping Your Tin Can Crafts Safe and Durable
Protecting your tin can projects from rust and wear is key if you want them to last beyond a few weeks. Tin cans, by nature, can corrode when exposed to moisture, so sealing the surface is a good first step. You might think just painting over them works, but it’s better to use a proper sealant designed for metal. Clear spray sealants or polyurethane coatings create a barrier against moisture and help keep that shine longer.
Choosing the right paint matters too. Look for rust-inhibiting paints or primers made specifically for metal surfaces. They not only add color but also prevent rust from creeping in under your art. I learned this the hard way when a can I painted with regular acrylic started to flake after being outside in humid weather.
Once your craft is sealed, think about usage. Avoid putting your tin crafts directly where water pools or on damp soil—that just invites rust over time. Even indoor items benefit from occasional dusting and a wipe-down with a slightly damp cloth to keep moisture buildup at bay.
Routine upkeep is easy. Check for tiny scratches or chips in the paint, as these spots can quickly become rust magnets. A quick touch-up with sealant or paint can keep things protected. If you start noticing any rust, lightly sanding the area and resealing can help stave off more serious damage.
How do you protect your own tin can crafts? Sometimes, a little experimentation with different coatings can make all the difference. After all, the better you care for these pieces, the longer you’ll enjoy your handiwork without it looking worn or tired.
Conclusions
Recycling tin cans through crafts helps reduce waste and creates useful household items. With simple tools and your creativity, you can turn these everyday containers into stylish additions for your home. Each project is a chance to express your style and make your environment more organized and attractive.
Try these tin can crafts to see how easy and rewarding upcycling can be. As you gain confidence, you can explore more complex designs or personalize your projects to fit your taste. These crafts offer a great way to reuse, decorate, and enjoy hands-on creativity in your daily life.


